Get started: Android · Midscene Test · Model API Key
These are the setup steps for Midscene on Android with Midscene Test and a Model API Key. To choose another combination, change the answers below or see all setup paths.
Step 1
Install Node.js
Install Node.js ^20.19.0 || ^22.12.0 || >=24.0.0, then check that node -v works in your terminal.
The commands below use pnpm. If it is not installed yet, run npm install -g pnpm.
Step 2
Connect the Android device
Midscene uses adb on your computer to communicate with the target Android device over either USB or wireless adb. If adb is already installed and your device is connected, skip directly to Verify the device connection.
Install adb
- Install
adbvia Android Studio or the standalone Android command-line tools. - Run the following command to verify the installation:
Output similar to the following confirms a working installation:
- Configure the
ANDROID_HOMEenvironment variable as described in Android environment variables, then check that it takes effect:
The output should point to your local Android SDK directory, for example:
Enable debugging and connect the device
The steps below use a USB connection as an example. If your device is already connected over wireless adb, you can keep using that connection.
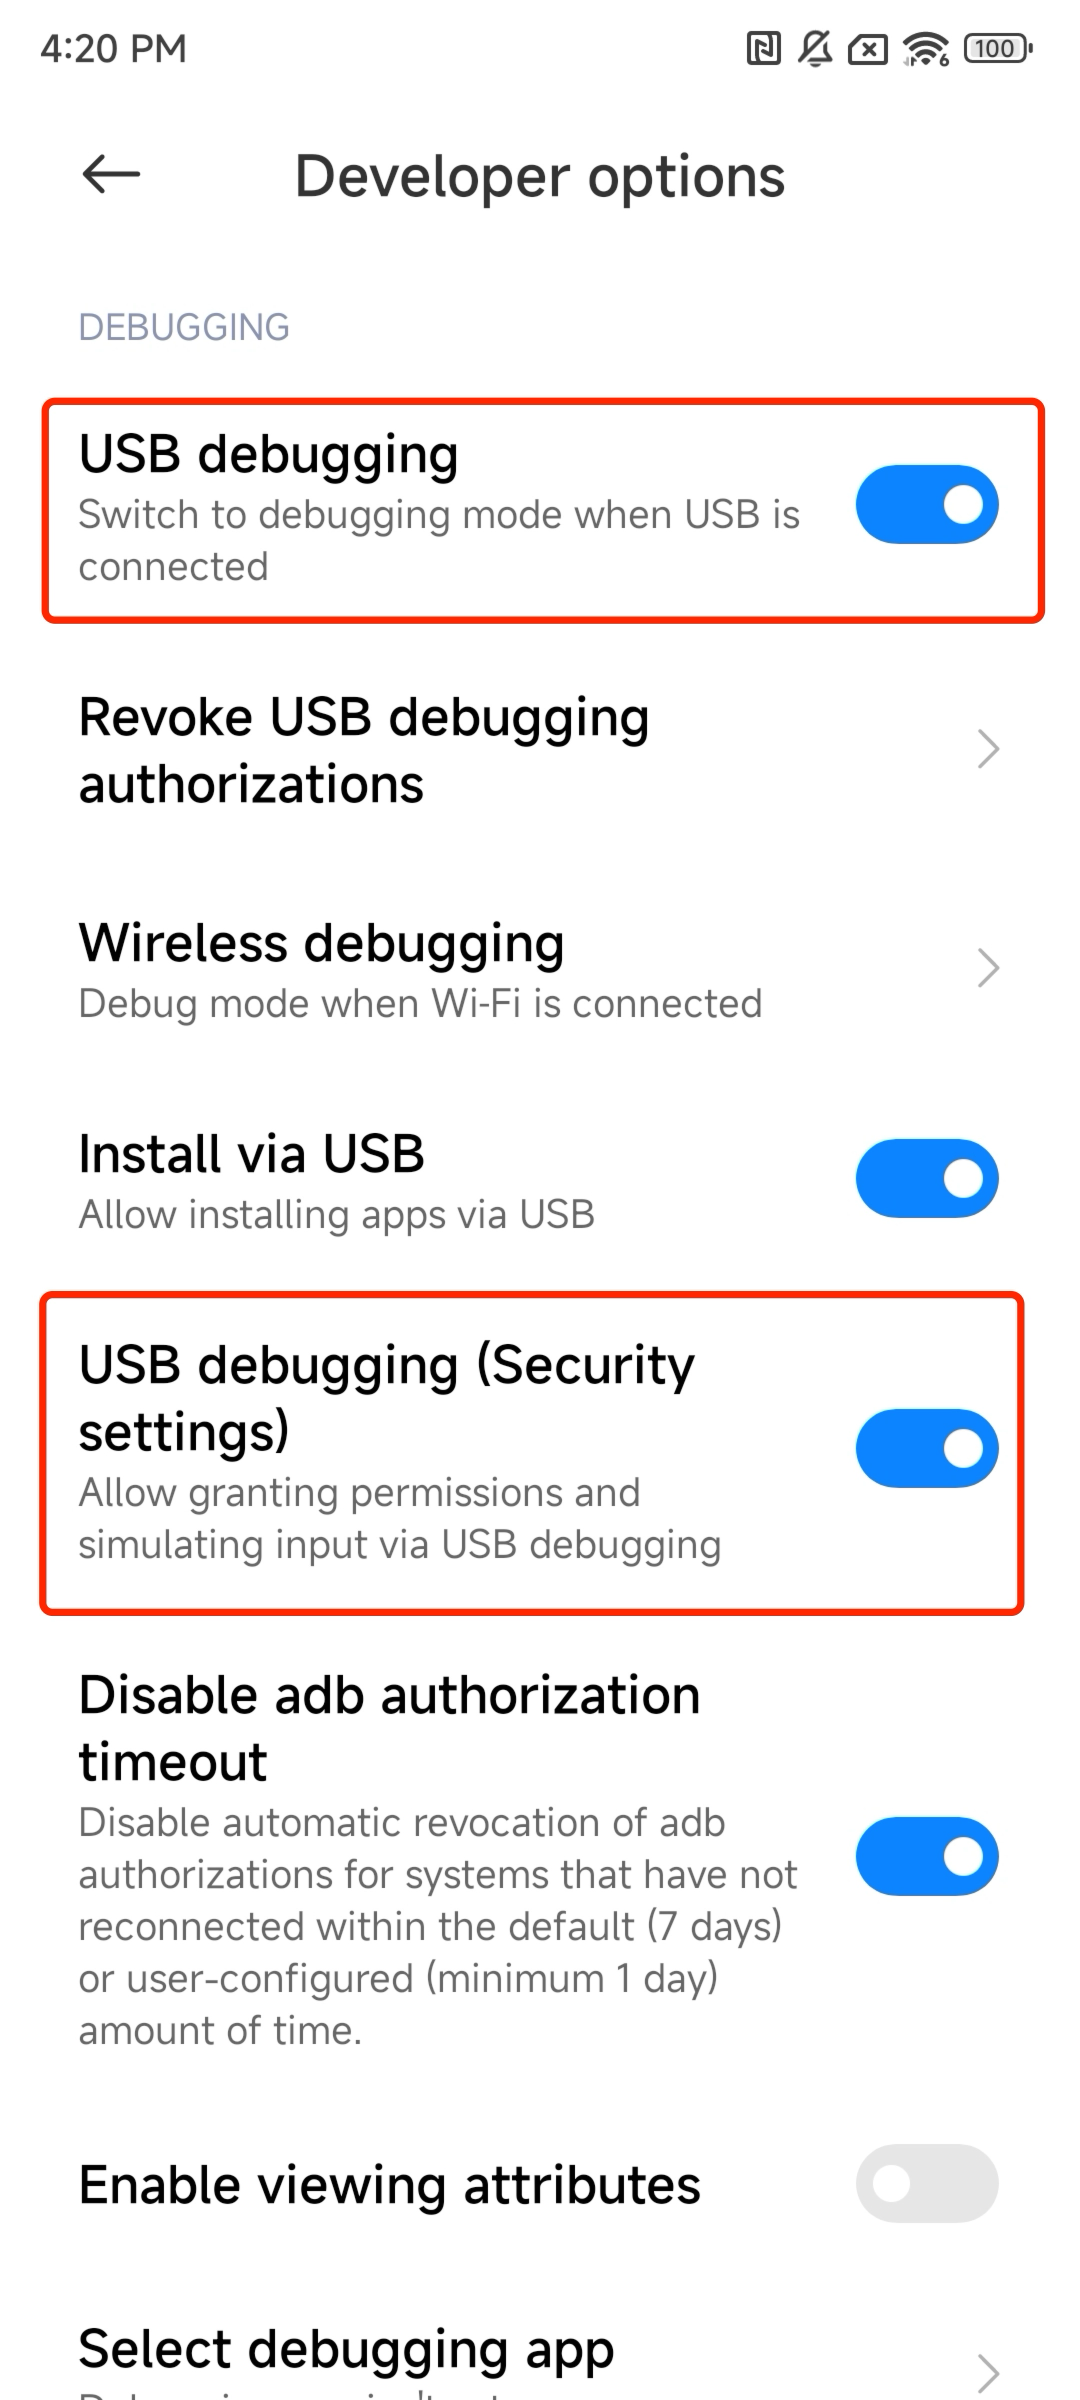
- In your phone's Developer options, enable USB debugging (and USB debugging (Security settings) if available, so Midscene can inject touch events).
- Connect the phone to your computer using a USB cable that supports data transfer.
- Keep the phone unlocked and accept the Allow USB debugging prompt on the screen.
Verify the device connection
Run the following command to check the connection status:
When the device status shows device, the connection is ready:
If multiple devices are connected, note the device ID in the first column (such as s4ey59 above) so you can select the target device in Playground or your project configuration.
If the target device does not appear with the device status, check the following:
- Empty list: For USB, check the data cable (ensure it is not charge-only), USB connection mode, and USB debugging toggle; for wireless
adb, check the network andadb connectstatus. unauthorized: Unlock the phone screen and accept the Allow USB debugging prompt on the device.offline: Reconnect the USB cable or wirelessadbsession, and restartadbif needed. Proceed only after the status showsdevice.
Step 3
Create a test project
The command generates the project files, installs dependencies, and generates the Node Spec. It does not run tests. For the generated files, see Project structure.
Step 4
Configure a model
In the my-tests directory, copy .env.example to .env:
Choose a model below. Its configuration has four values. Open Get API key to create a key with the provider, then replace ...... in MIDSCENE_MODEL_API_KEY with it.
For other versions and usage notes, see Doubao Seed series.
To compare models, see the Model selection guide. For compatible models such as UI-TARS, see Use a model API key.
Fill in the four MIDSCENE_MODEL_* values in .env with this configuration.
Step 5
Verify the model and finish setup
Verify model connectivity and Midscene compatibility. The command reads .env from the current directory and does not need a browser or device:
If the check fails, see Verify model connectivity.
If more than one device is connected, set ANDROID_DEVICE_ID in .env to an ID from adb devices -l.
Step 6
Run the example and inspect the report
The example opens React TodoMVC in the device's browser and first checks that the list is empty. Keep the device unlocked. If todos remain from an earlier run, select All and delete every todo, including completed ones.
The terminal prints the results and a Report: path. Open the HTML report, then select a case and a step to inspect screenshots, inputs, outputs, and errors. Reports are written to midscene_run/report/ by default.
When the case passes, your model, environment, and project are all working. For execution options, see Run tests.
Step 7
Next steps
- Explore more examples: Showcases includes demo videos and full execution reports across platforms.
-
Test your own app: In
cases/todo.yaml, replace the TodoMVC setup inbeforeEachwith alaunchNode that opens your app:Use the package name on Android, the bundle identifier on iOS, or the bundle name on HarmonyOS. See Built-in Nodes across platforms for other system operations.
- Write and organize cases: Write YAML cases covers inputs, variables, tags, and hooks.
- Run in CI: Run in GitHub Actions.
Want to try another platform or way to use Midscene? Back to top to change your selections.